Introduction
When running a Bank mostly in the cloud, it’s not uncommon to need to send traffic between clouds to transfer and process data. Over time, this amount of data can really grow and when paired with Managed NAT Gateway costs, the amount you’re paying just to move data over the public internet between clouds adds up significantly.
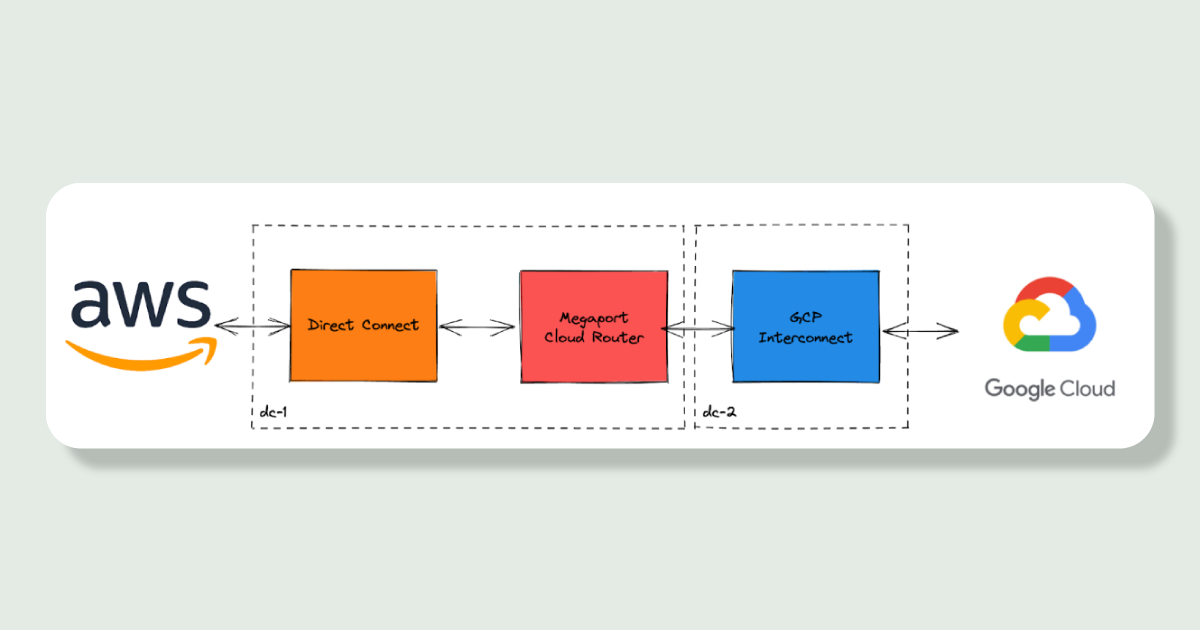
To try and reduce this, we introduced a private link between AWS and GCP to route our traffic over. We route through private links to a data centre then back into our cloud environments saving on those pricey NAT gateway fees. We’ve currently saved about 60% on our GCP egress NAT gateway and this saving grows as the amount of traffic we move cross-cloud increases.
How we did it
Now, if we want to start routing traffic not via the public internet we need:
A private connection into our AWS network
A private connection into our GCP network
A router connecting both together
A way to route the traffic going to Google APIs via the internet and send it down our private link instead. This way we can send traffic without incurring NAT gateway charges.
The private connections
To route traffic between our clouds we need a router which bridges the two private connections into our networks on either side. For the AWS connection we can go to any data centre on the AWS Direct Connect Locations list and for GCP their Interconnect Colocation facilities.
We do run our own set of servers in a data centre however, we wanted to see if we could do this fully on managed infrastructure. Everything we’ve deployed is via Terraform and can be dynamically scaled with a line of code change.
This is where Megaport comes in (not an ad), Megaport is a company which offers scalable bandwidth between public and private cloud, basically a software layer to manage network connections in and out of data centres. This means we can call some APIs/run some Terraform and spin up Software Defined Networking (SDN) in a supported data centre of our choice.
We can use Megaport to create a virtual router and two connections, one to each cloud network, and it can bridge between data centres we choose. This means if we want to route from one cloud to another cross-region Megaport will handle this for us as well.

Changes to our current cloud network
Now we have a private connection into each of our clouds with a router bridging them. We now need to make changes in our cloud network to route traffic down these.
GCP provides a way to route traffic to a set of IP addresses and have that be routed on to the proper APIs based on the Host header set in the request. If we add networking to just these IP addresses any requests we send will go to the proper API.
We needed to:
Connect the private link into our network
We already had a transit gateway we use to connect our VPCs to the Direct Connect here avoiding us needing to connect it to every VPC we have.
Tell traffic for these IPs to go via the Transit gateway
We added entries to our subnet route tables pointing to the transit gateway
Send traffic which hits the transit gateway down the Direct Connect
We added entries to our transit gateway route table pointing to the Direct Connect

How to hijack traffic bound for Google APIs
Hijacking this traffic could be done purely with DNS, we could set requests for `*.googleapis.com` to resolve always to these IP addresses. That traffic would then be routed via this private link with our setup in the above section.
However, we also wanted to:
Have fine grained controls over this traffic, opting in single endpoints eg. `bigquery.googleapis.com` but not `maps.googleapis.com`
Have automatic failover in case of problems with this connection, going back over the internet when this fails means we don’t have any downtime for maintenance or during an expected fault. In this case, we’re happy to take the hit on the more expensive data transfer in favour of unavailability.
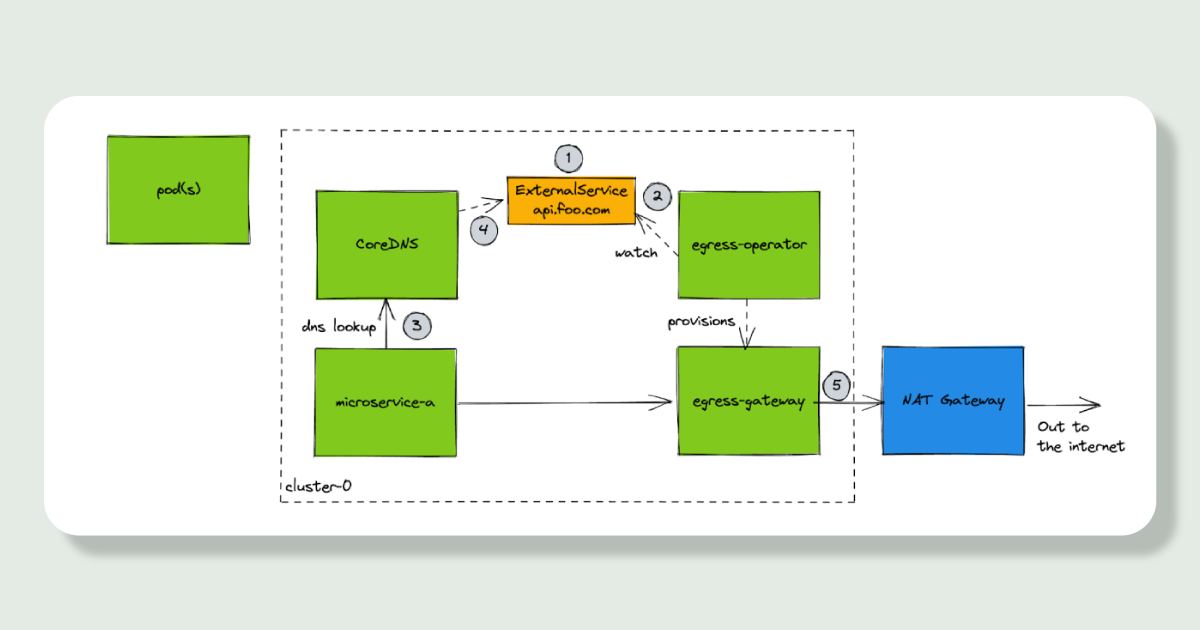
Now enters the egress-operator, we’ve posted before about how we control outbound traffic from our Kubernetes cluster and every component we have which utilising these APIs run inside Kubernetes. So could we configure these egress gateways we already have for this purpose?
Let’s talk about how these egress gateways work:
For each endpoint you want to control you create a `ExternalService` Kubernetes resource which specifies the hostname `bigquery.googleapis.com` you want to route via a gateway
`egress-operator` watches for these `ExternalService` resources and for each one creates a set of Envoy pods which proxy traffic to the endpoint instead of your pods going directly out to the internet. This means you can set up Kubernetes network policies between your microservice pods and the gateway pods to control if a particular microservice can talk to a particular endpoint.
Kubernetes pods will lookup hostnames on a central DNS server running in the cluster, CoreDNS
`egress-operator` provides a plugin for CoreDNS to overwrite the result of DNS entries with your gateway pods instead
Your network request goes: microservice -> egress-gateway -> out to the internet

Updating the egress-operator to support our use case
We modified the `egress-operator` and the `ExternalService` resources to allow specifying a set of IP addresses to override traffic to. Within the Envoy config this overrides the Address field so the `Host` header (where the traffic wants to go) stays the same but it’s pushed down our private link.
To allow automatic failover we then modified the `egress-operator` to generate an Envoy Aggregate cluster, this is a way of combining multiple clusters (upstreams) and prioritising and providing failover between them. If the health checks for the private link override IPs are failing we seamlessly switch to routing via the internet.

These changes mean we can opt in/out single endpoints to slowly roll out our changes and if we encounter problems we will auto failover to the existing setup.
Conclusion
With these changes in place we slowly opted in all 26 of our Google API endpoints to use this. We didn’t see a slow down in performance and it means any future traffic we want to route between AWS and GCP we have a private, much cheaper, way to send this traffic.
We’re spending more on new components in AWS, Megaport and GCP but the total costing of these is still significantly cheaper then our direct egress via NAT gateways. Overall we’ve reduced the cost by 60% and any future increases of traffic to GCP will just grow this amount saved as we utilise the connection setup more.