We’ve built bespoke software from scratch, that helps us manage chats in the app. So whenever you reach out to us, we’ll use Monzo Chat to support you.
I wanted to share how we implemented Monzo Chat on Android. We’ll cover:
What we needed to build: The history behind the software, and the problems we needed to solve.
Picking the right tools for the job: The tools we had at our disposal and some interesting things we discovered while using them.
How we built it: We’ll share the solution architecture and explain how we combined all the different tools, along with the layers of abstraction we used, to meet our requirements.
We’ve simplified some of the code in this blog post: We’ve included lots of code examples to help you understand how we built Monzo Chat. In some cases, we’ve simplified that code to make it easier to read. The examples are very similar to what’s in our actual codebase, but you might find that some snippets don’t fit together. If you find any issues, please leave a comment at the bottom of the post and we’ll fix them 🙂
Part 1: What we needed to build
Why we built Monzo Chat
In-app chat is the main way that we give our customers support. Until recently, we used a third party product called Intercom to host our in-app chat service. But a few months ago, we decided to build our own chat functionality from scratch. We thought it’d be safer, more convenient and more flexible (you can read more about why we decided to build our own chat software in this post.)
How chatting worked before Monzo Chat
The Intercom library is quite simple to use. First, you create an Intercom class with a company-specific apiKey and appId. This becomes the main way you interact with Intercom. It provides functions for registering an FCM token, setting a unique ID for the currently logged in user, plus opening a list of your previous conversations, or starting a new one. From then on, you don’t have much choice in how the chat looks or performs. This is the interface we had to work with:
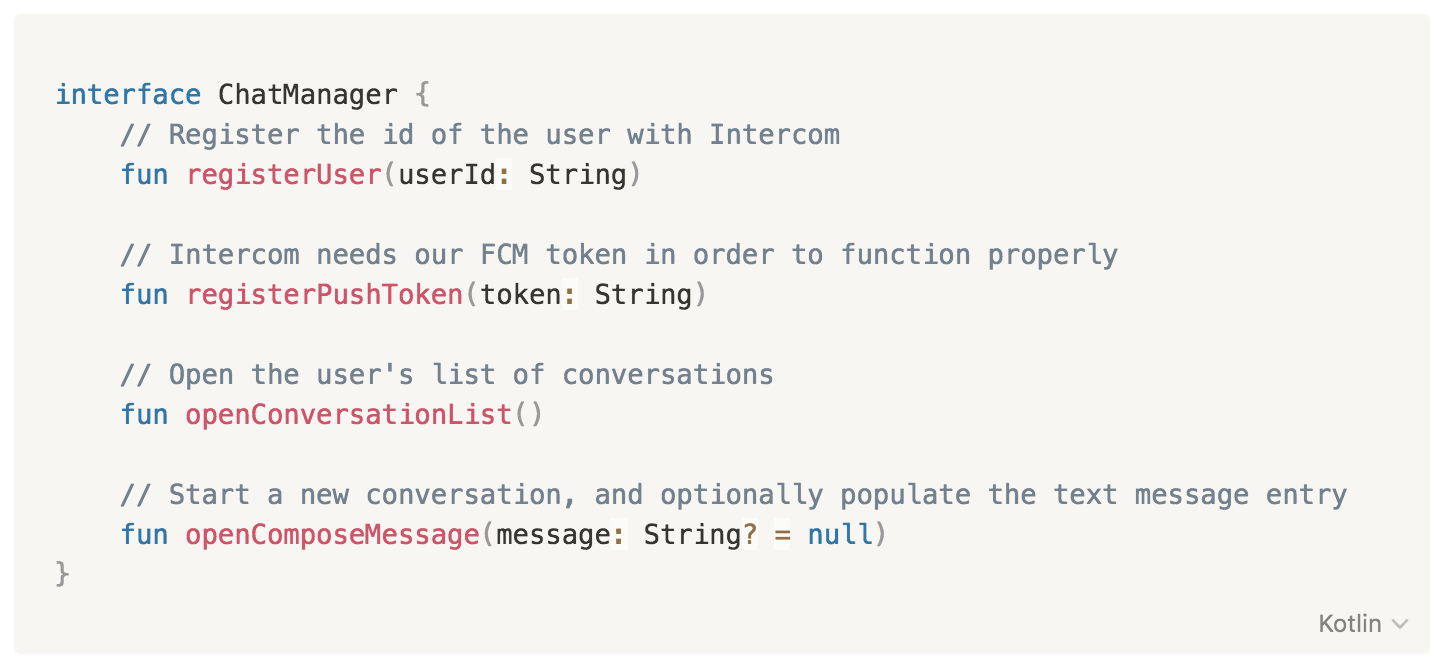
We wrote a wrapper class around the Intercom SDK (called IntercomChatManager) which implemented the above interface. We do this for pretty much every third-party library we use in our app. Other classes simply depend on the ChatManager interface, without knowing anything about Intercom. If you want to describe it in design pattern terms, it’s called the ‘Facade Pattern’ .
Using this interface really helped us transition to the new chat functionality. All we had to do was to swap the implementation depending on which chat functionality (Intercom or Monzo Chat) the user was meant to have.
What Monzo Chat needed to do
We needed Monzo Chat to send and receive text and file messages. But there were some stranger requirements too.
We had to make it look like one long conversation
For various reasons (you can read more about this here) we decided that the chat experience should look like one long conversation (rather than having multiple threads/conversations open at the same time).
We needed to include interactive elements
For example, we normally send a survey to users after we’ve finished a conversation. The users simply have to select a rating from five options (rather than having to type). In the future, we also plan to add other types of interactive messages that help people send information more easily. Imagine yes/no or multiple choice questions, or a dropdown menu where you could choose which transaction you wanted to talk to us about.
We had to allow multiple participants
Because there's only one, long-running conversation, the COp (our name for anyone working in customer operations) the user is speaking to could change several times. So our client would need to make it easy to differentiate between the different participants.
We also wanted the option to test using automated messages, to help users find answers before a COp is available. In this scenario, we’d need to make it clear when you were talking to an actual human, and when you were reading an automated message.
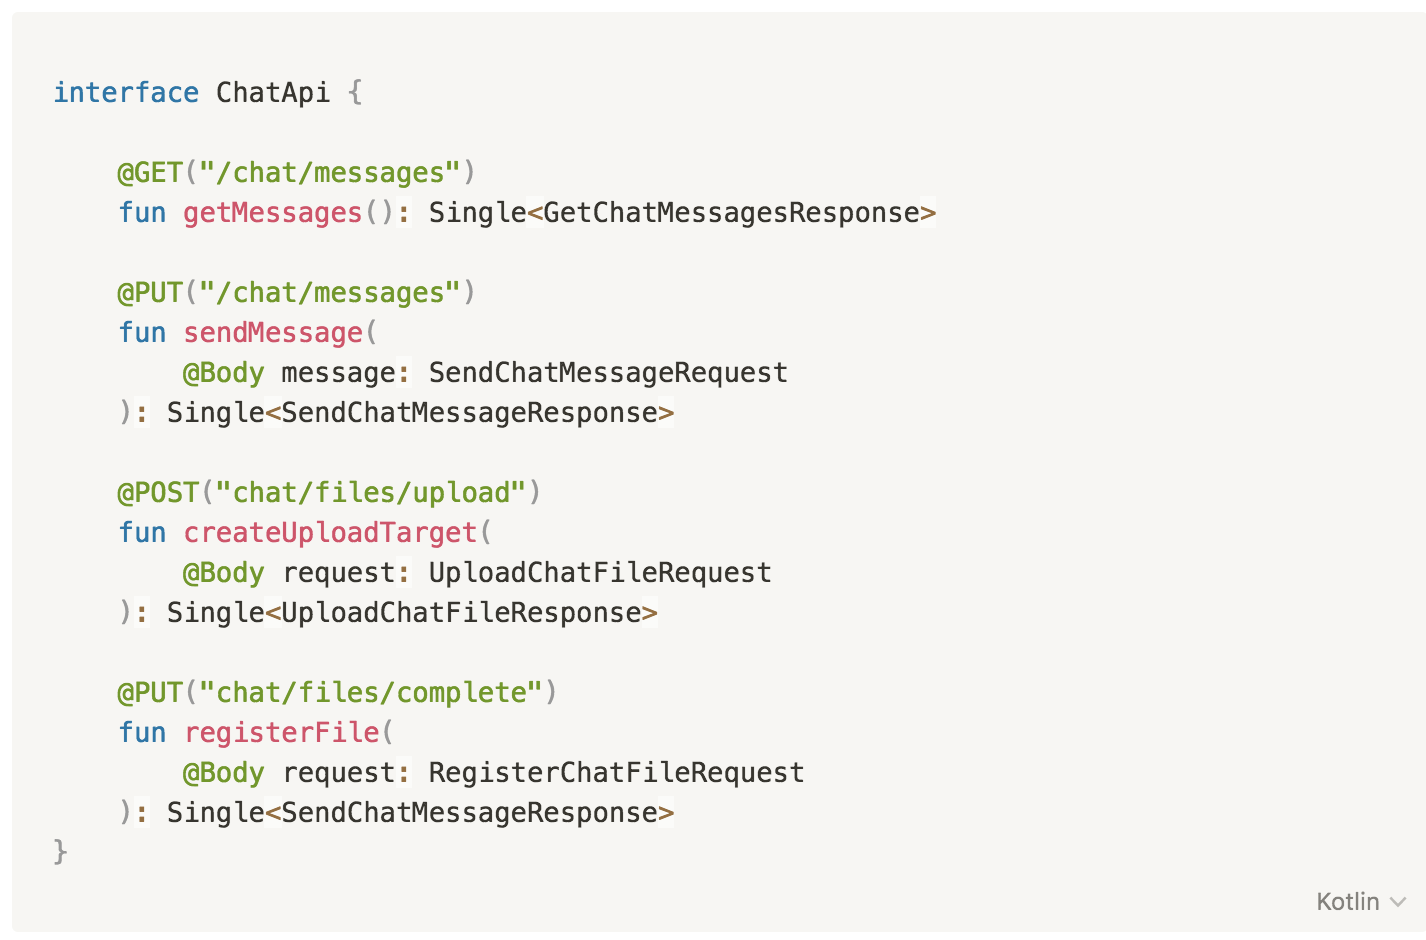
We designed an API
The API we designed is quite simple and made up of the following endpoints:
GET /chat/messages: Returns the list of the whole message history for the currently logged in user. Since the median message count of our users is quite low, we currently don't need to paginate this information.PUT /chat/messages: Sends a message with the text the user typed.POST /chat/files/upload: Notifies our backend that we have a file to upload. It will come back with a URL to upload to.PUT /chat/files/complete: After a file has been uploaded to the previous URL, this endpoint notifies the backend that the upload was done successfully.
To make the above easier to picture, here's the complete Retrofit interface we use:
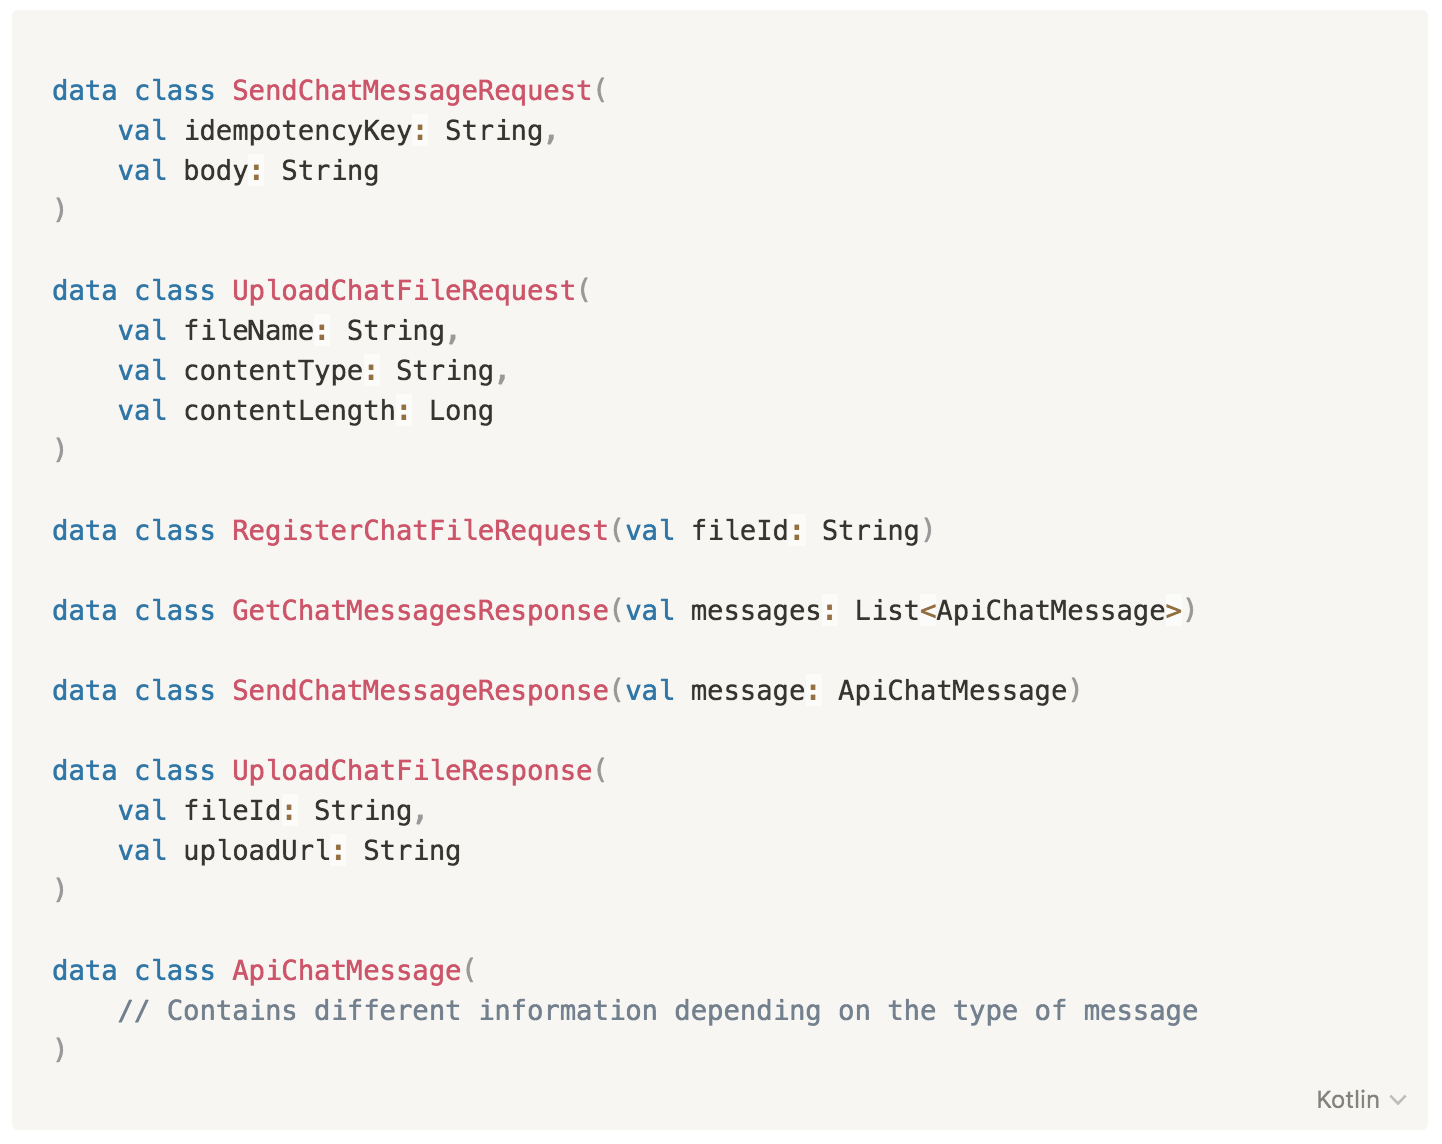
And here’s a (simplified) list of the API model classes we use:
Part 2: picking the right tools for the job
Building a chat client on Android is a lot simpler than it used to be. There are now a multitude of tools to help developers with the trivial details. Which is great, because it lets us focus on the most important problems, like what’s specific to our chat client.
Here’s a list of some very well known tools we already use in our app, and how different aspects of each tool significantly simplified the Monzo Chat implementation.
RecyclerView
Using a RecyclerView is quite obvious, given that we need repeatable scrolling content. But some features of the RecyclerView were also surprisingly helpful when writing a chat client:
LinearLayoutManager.stackFromEnd = true
This is a flag you don’t tend to see too often (and there’s very little documentation that goes with it). It essentially reverses the order that things are laid out in the RecyclerView. In a chat screen, where new content is always added at the bottom, this is exactly what you want. There’s no need to maintain a list in reverse chronological order, this flag will handle everything for you!
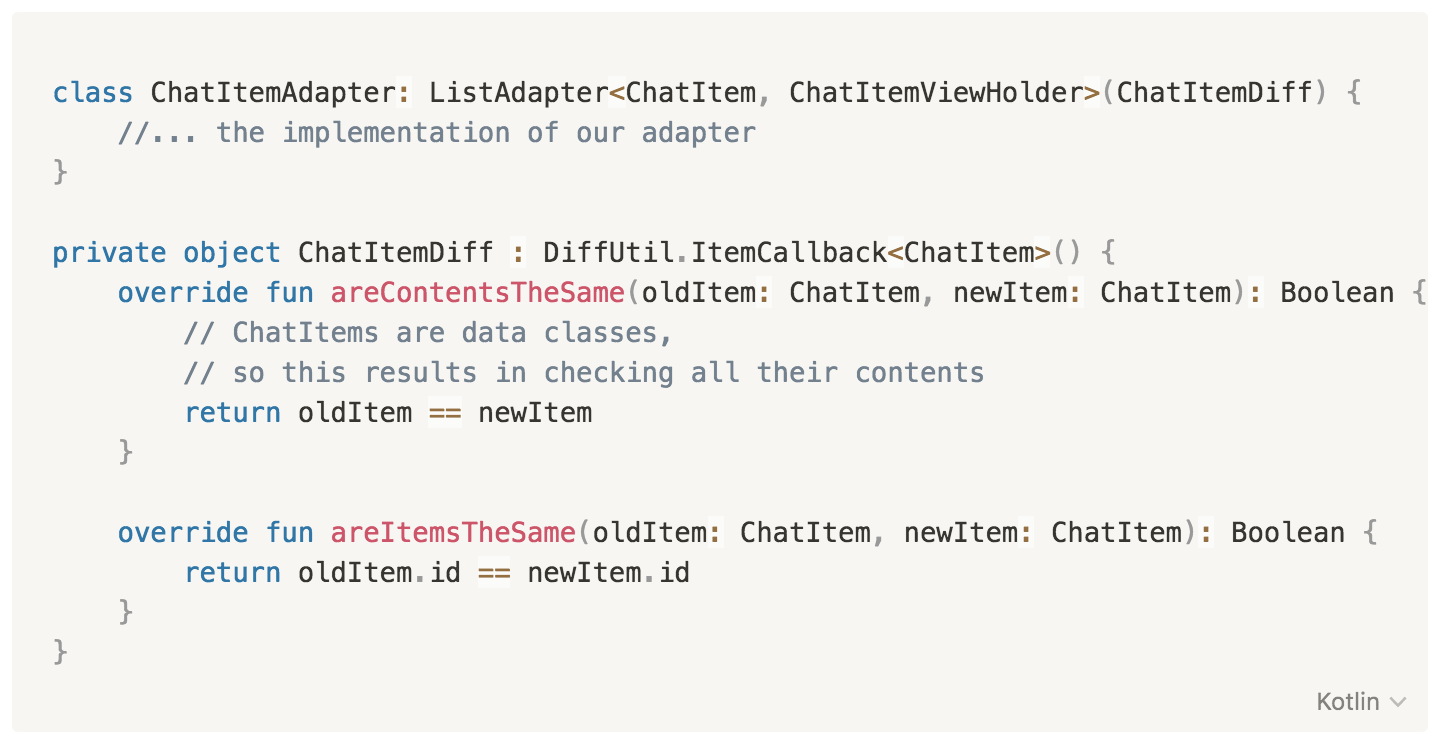
androidx.recyclerview.widget.ListAdapter
The ListAdapter is a class that calculates changes in the adapter’s underlying data set (it even does this asynchronously, to avoid scrolling ‘hiccups’). All you need to do is provide a simple implementation of a DiffUtil.ItemCallback, to demonstrate when two objects represent the same item (i.e. have the same id), and when their contents are completely identical. For the latter, Kotlin data classes – and their automatic 'equals()' implementation – are invaluable.
Here's what our adapter implementation looks like:
SimpleItemAnimator.supportsChangeAnimations = false
The RecyclerView comes with a default implementation of an ItemAnimator, called SimpleItemAnimator. This implementation provides animations whenever the dataset changes.
But there’s a problem with the default implementation, caused by the fact that chat messages don't remain constant – they actually have their own lifecycle. Consider a message in a popular chat client like WhatsApp. A message can be in a number of different states, like: 'sending', 'sent', 'received', or 'read'. If we used the SimpleItemAnimator as is, changing the state of a message would result in an animation.
We could turn off all animations (by removing the itemAnimator altogether), but this wouldn’t be ideal, since new messages should animate into view. The solution lies in this simple flag. Setting it to false results in add/remove animations still being enabled. But updating messages with the same id doesn’t result in an animation.
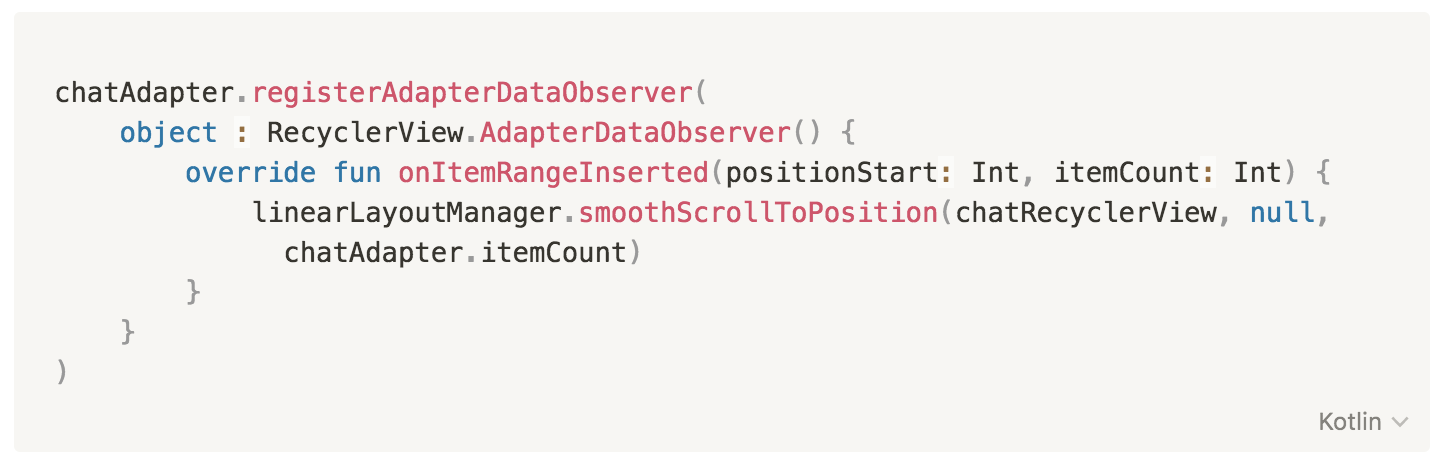
Right after you receive a message in a chat, you’d usually need to scroll to the end of the message list. Scrolling to the end of the list is very easy, but the question is, when should this happen?
We could scroll every time the messages are refreshed from the API. But since this doesn't necessarily mean we have new messages, so we’d end up scrolling to the bottom way too often.
We could also do it every time new items are inserted in the database. This makes sense, but it's not that simple to implement. We’d need to maintain the current item count in the database, and compare it with the new count. Plus, it seems strange to have this logic for a function related purely to UI.
The best solution is to monitor the data on the actual adapter, with this helpful callback. With three lines you get exactly the behaviour you need! We scroll to the end of the list when new items are inserted, and only then.
Kotlin
We can definitely consider language features as 'tools'. Sealed classes were the Kotlin feature that had the biggest impact on the chat implementation. They made things so much easier to model and express, that it's almost impossible to imagine how we'd have implemented Monzo Chat without them.
Here's a simplified view of how we represent chat messages:
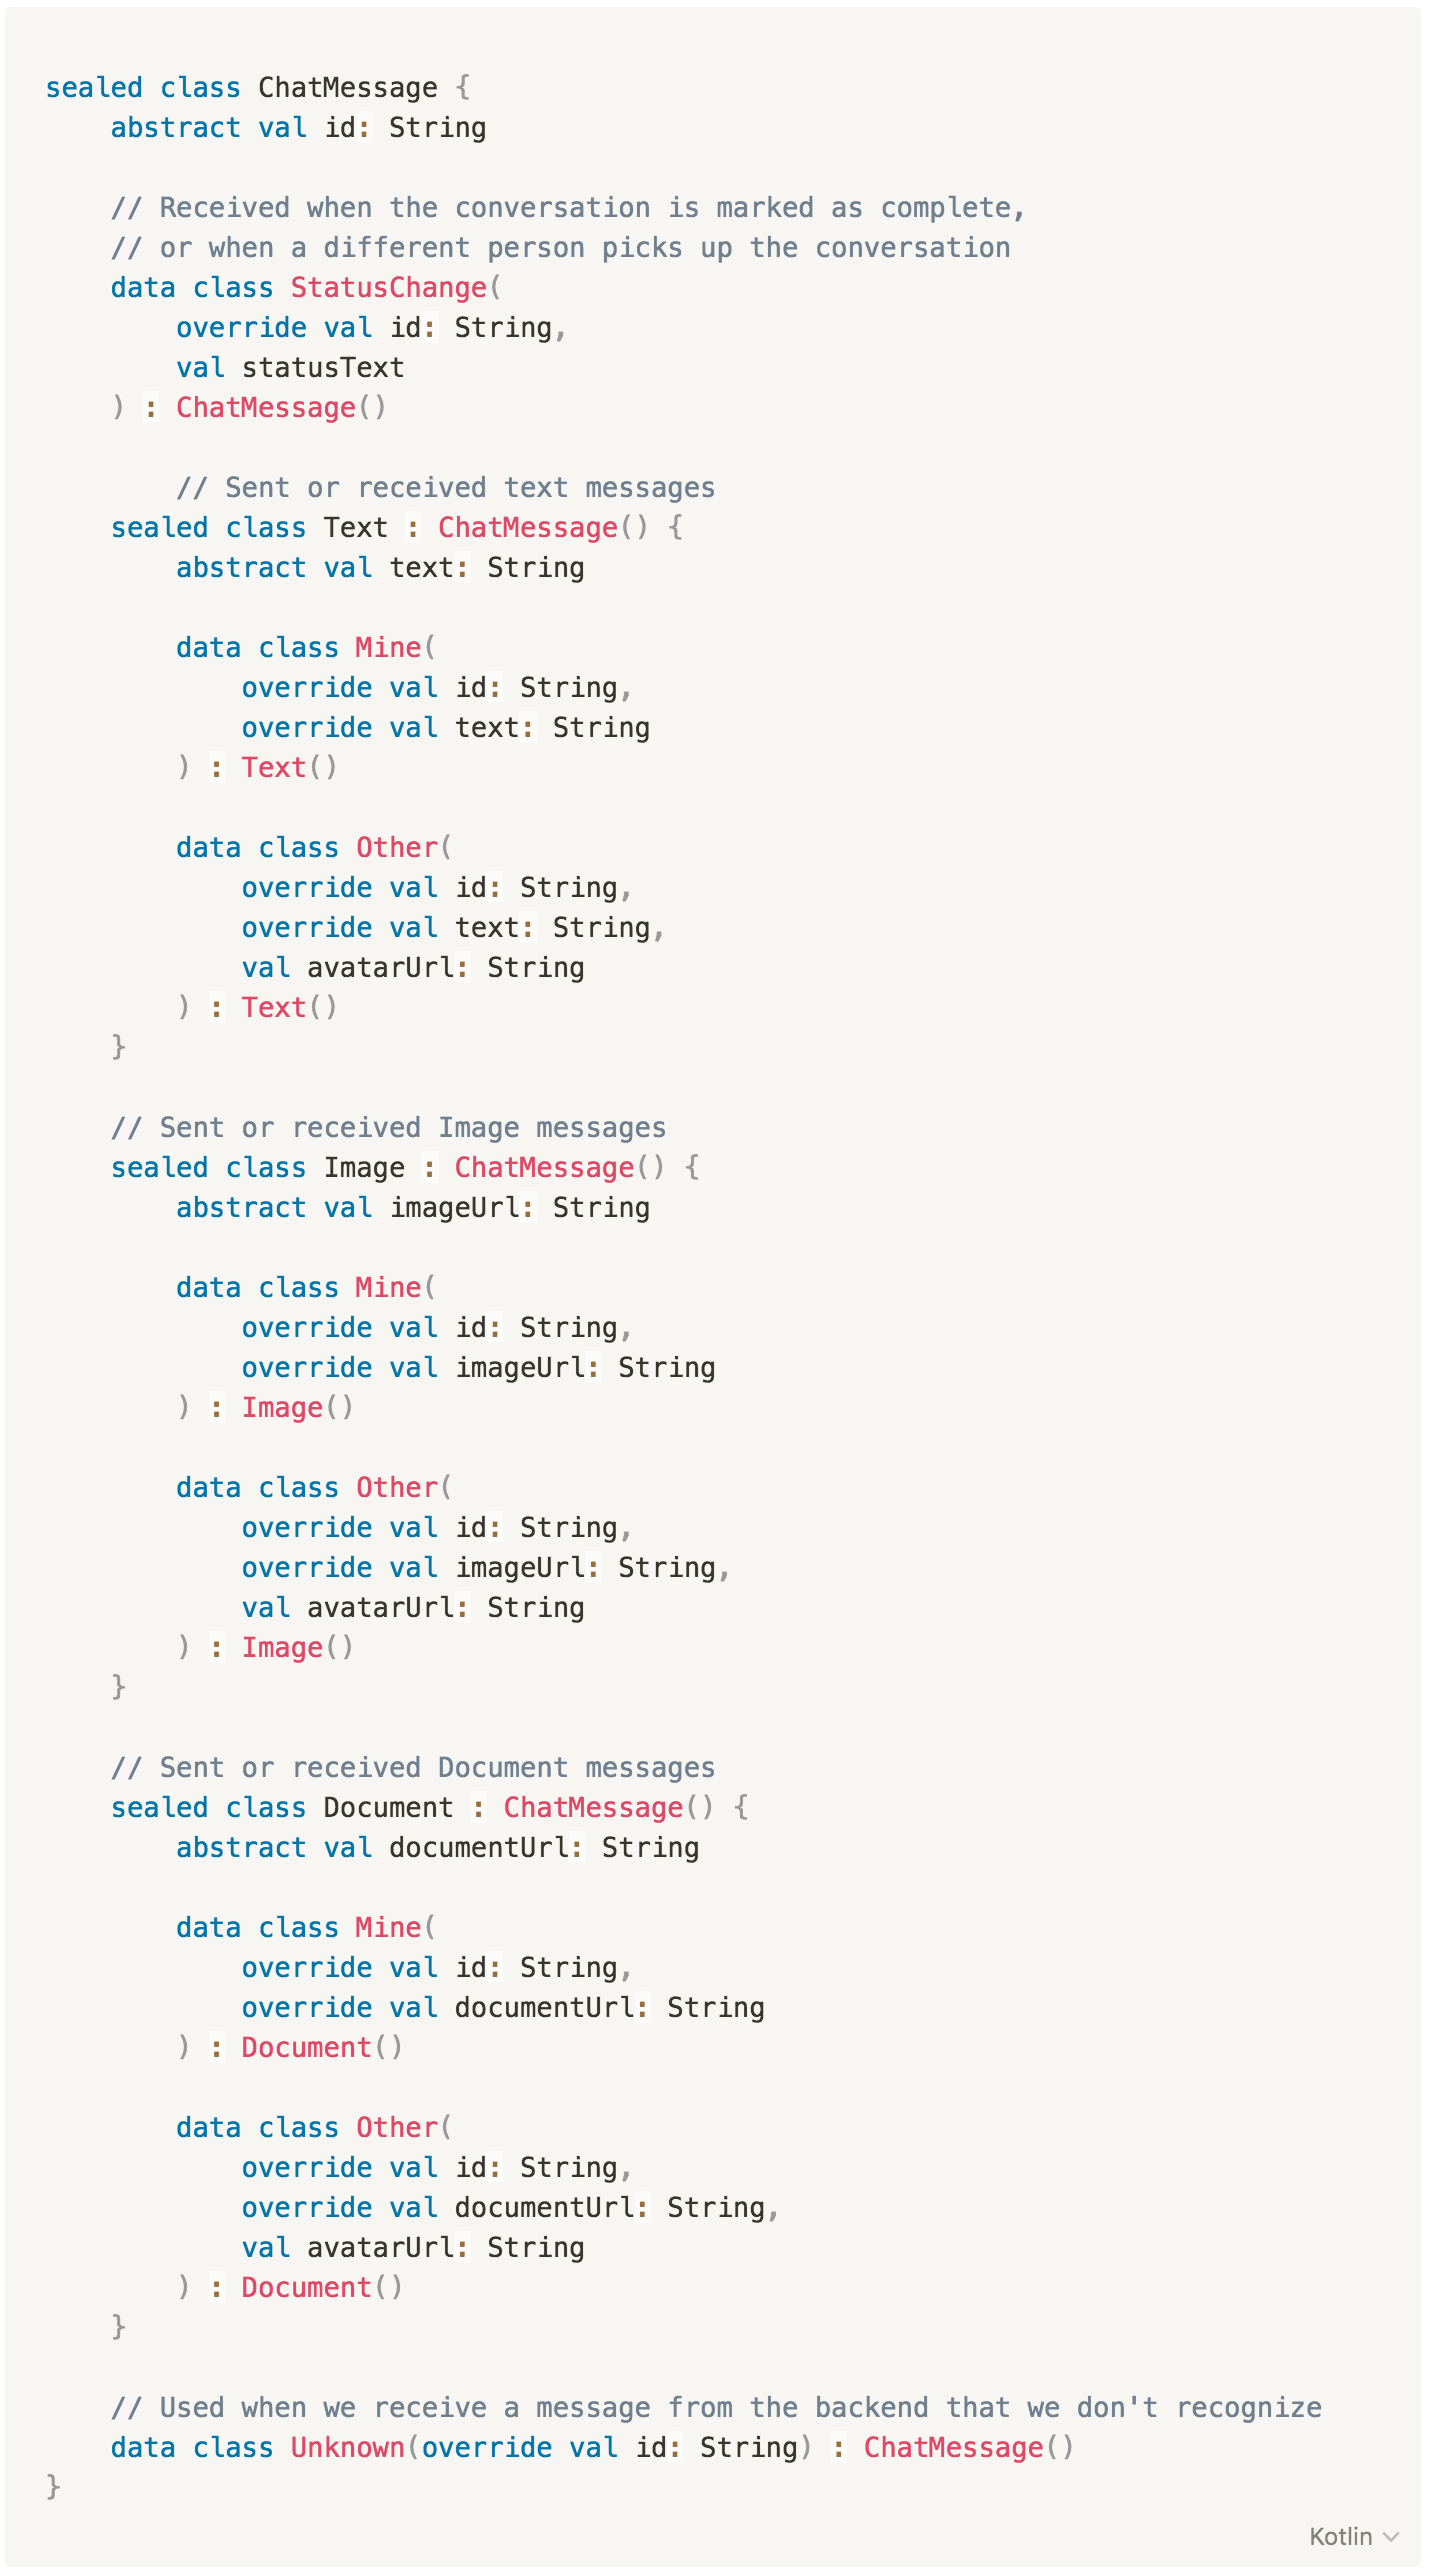
We have a 'hierarchy' of sealed classes, where each contains different information. At a glance, you can see how powerfully expressive this hierarchy is. When we encounter a ChatMessage.Document.Mine it's quite obvious what it represents.
RxJava
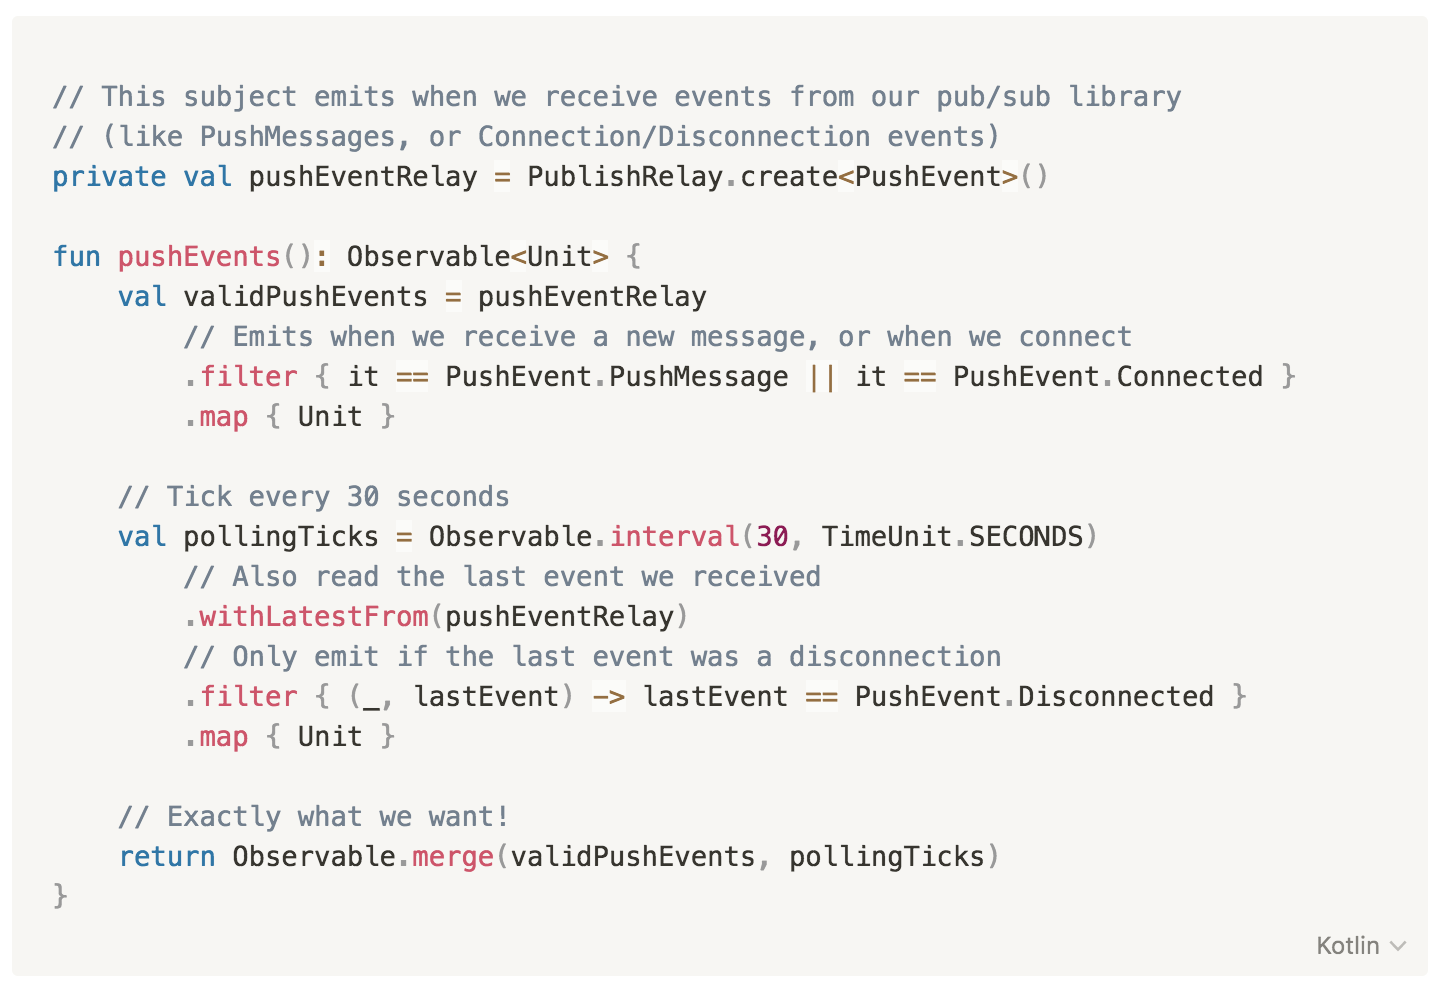
We use RxJava quite heavily in our Android app at Monzo. And it’s invaluable in a real-time situation such as a chat client. It's actually easier to demonstrate how helpful RxJava has been by using a few examples. In all the cases below, the same outcome could be achieved without RxJava, but not in such a readable, concise way.
Monitor push events from our pub/sub library, and fall back to polling if it gets disconnected
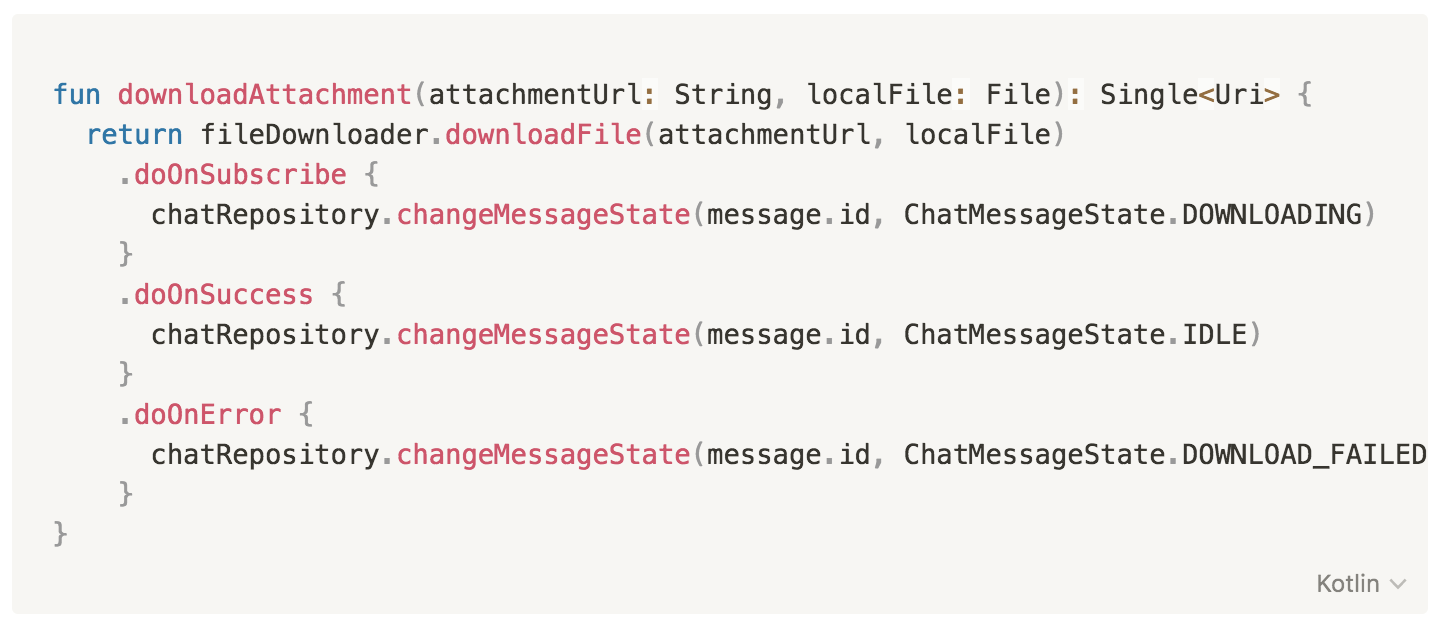
Download an attachment and update the message lifecycle at the same time (this will result in the UI being updated)
Upload an image in three steps (create an upload target, upload, and register the result):
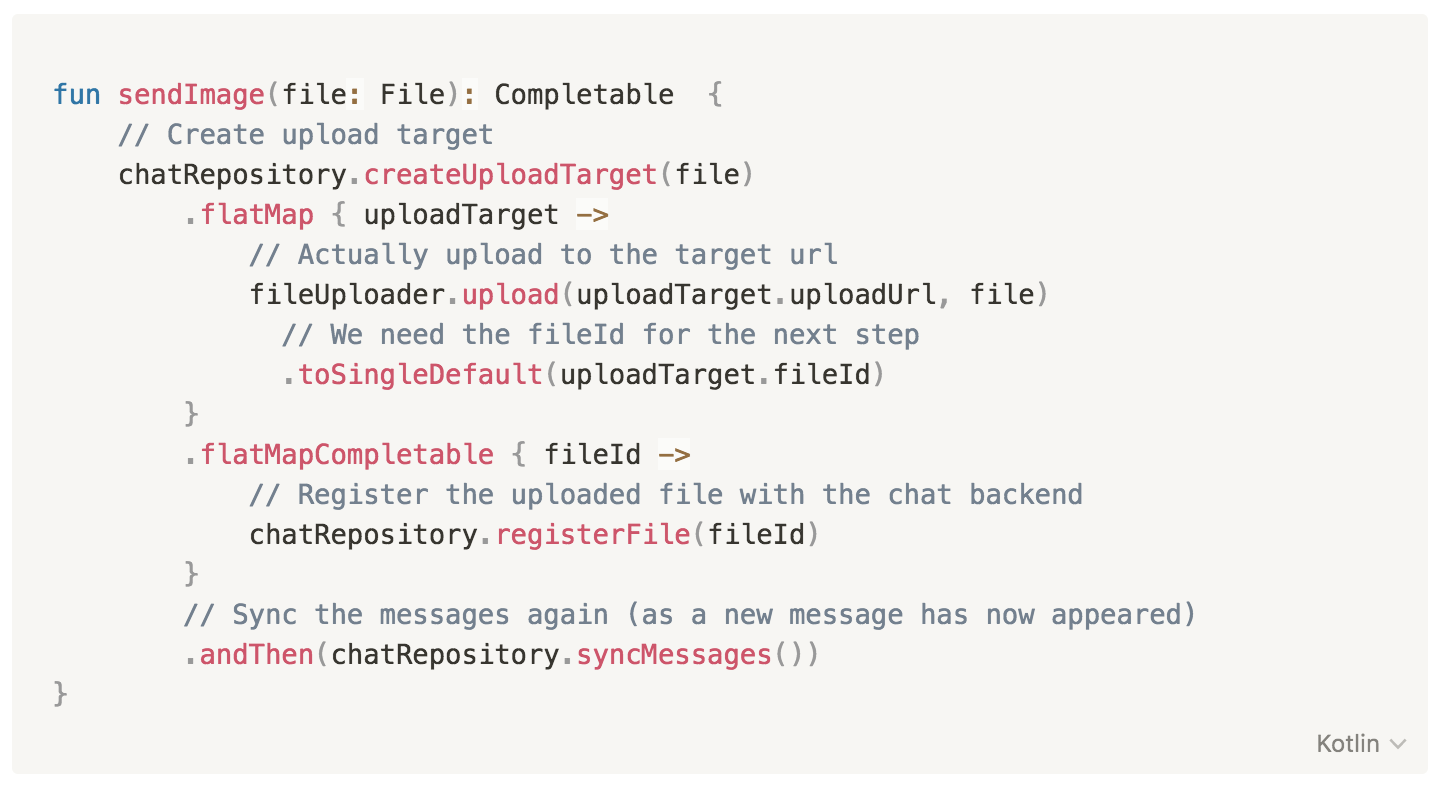
Implementation details
You can consider the rest of the tools we used for our solution as 'implementation details'. They are still required, but the rest of the chat client isn’t aware of their actual implementation.
For the communication with the server we use Retrofit (like most Android apps).
For persistence, we'd been using Realm. But we’ve started using Room more and more. Room isn’t without its drawbacks (especially when you want to represent one-to-many or many-to-many relationships). But for chat messages, it fits perfectly. Chat messages don’t have complex data relationships. All you need to do is flatten and store some information. The fact that Room provides reactive classes when querying it also fits very well with our RxJava usage.
We also use a pub/sub library called Pusher. We're actually still evaluating it. The main thing we want is a way to reliably connect to a websocket, and be notified about new messages. We might need to replace it in the future with something else (like PubNub or maybe even Firebase).
Part 3: How we built it
This is a bottom-up description of how we combined the above tools, wrote reactive code, and followed the clean architecture paradigm to come up with the complete solution.
Model classes
It’s very important to model the information in each level of our architecture correctly. In this case, we have four main levels of model classes:
An
ApiChatMessageis the chat message as represented in the APIA
DbChatMessageis the chat message as represented in the client storage (Room)A
ChatMessageis the 'domain model', the ideal representation of this information for our clientA
ChatItemrepresents a row in the chat RecyclerView
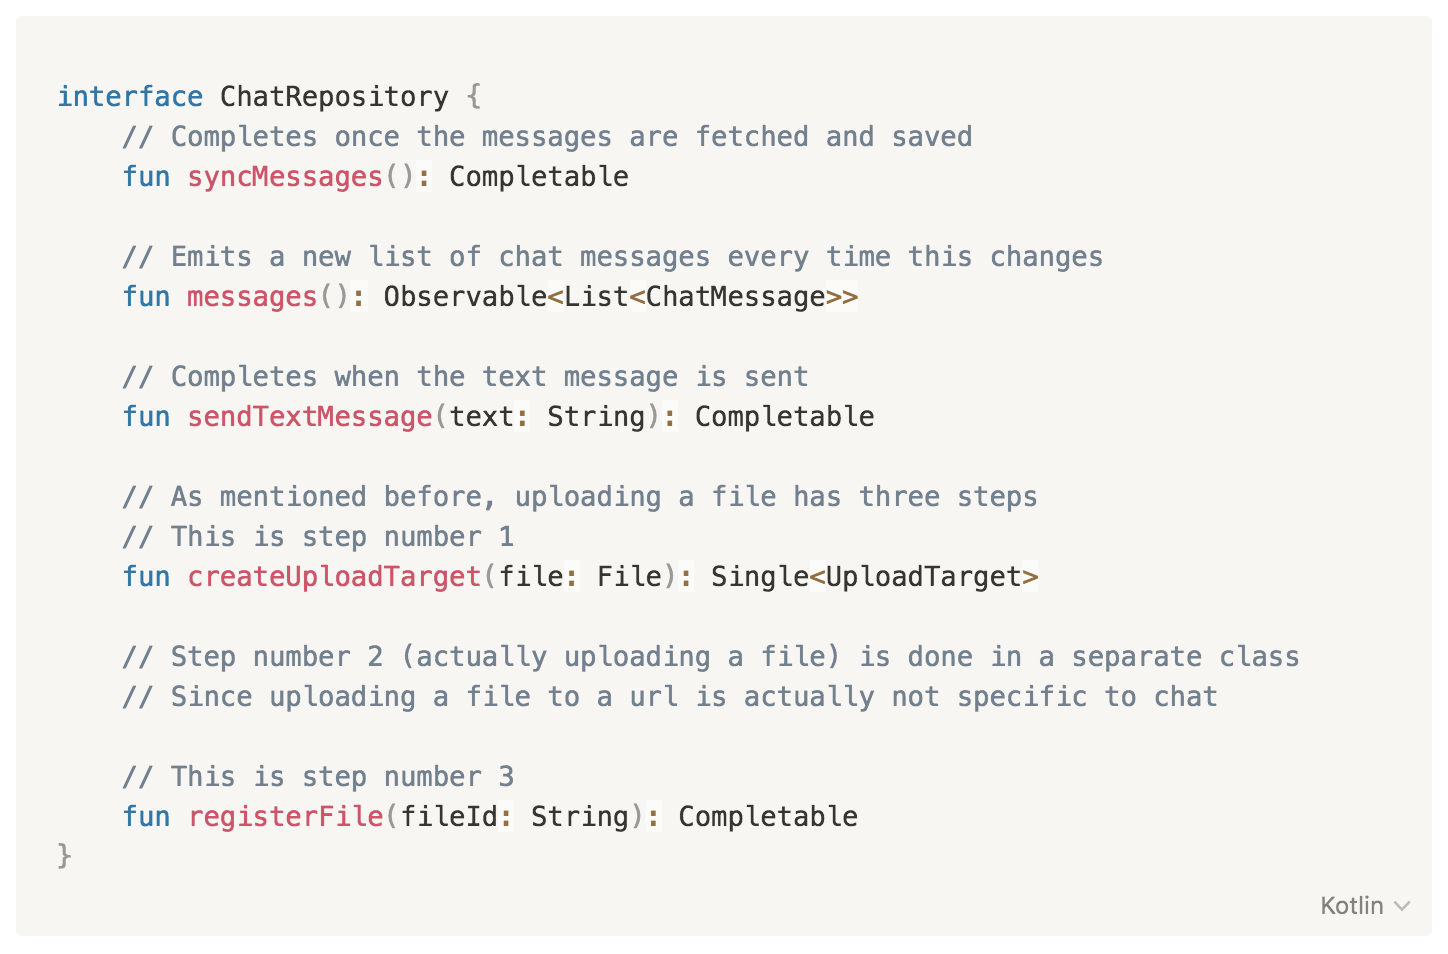
ChatRepository
We create repositories for pretty much every piece of information in our app. For most things that come from the backend, we have:
An Api class (i.e. ChatApi), which is just the Retrofit interface declaration (refer to the first part to see the actual interface)
A Storage class (i.e. ChatStorage), could be a class that stores things in the Android preferences, or in Realm, or (in our case) is just the @Dao Room interface.
A Repository class (i.e. ChatRepository), which combines the Api and Storage classes. The repository has methods to:
‘sync' the data (i.e. syncMessages()) - which means a) fetch it using the Api class and b) store it using the Storage class
'monitor' the data (i.e. messages()) - which means to simply monitor the DB for changes
‘send’ data to the server (i.e. sendTextMessage()/createUploadTarget())
Internally, the repository also handles the mapping of Api model classes into Db model classes, and those into domain ones. It provides only domain model classes to its clients.
Repositories generally have a reactive interface, so in our case it would look like this:
ChatPushRepository
Apart from having a repository to sync and monitor the messages, we need a way to get notified about when to actually trigger a sync. This is where our pub/sub library (Pusher) comes into play. Since we want to isolate the rest of the app from the details of how we receive pushes, we expose a ChatPushRepository interface which notifies us about push events:
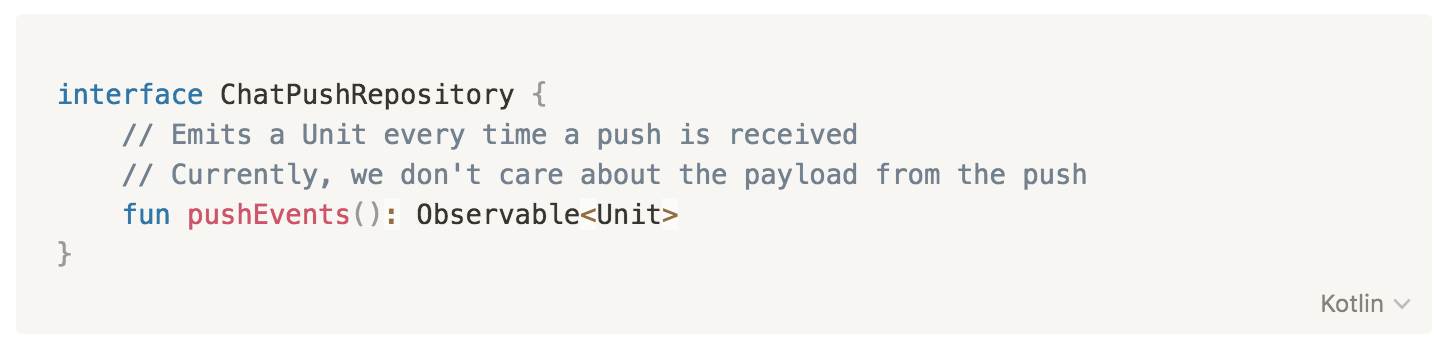
The implementation of this interface, uses the Pusher SDK, and it can be found in the previous article (the RxJava section).
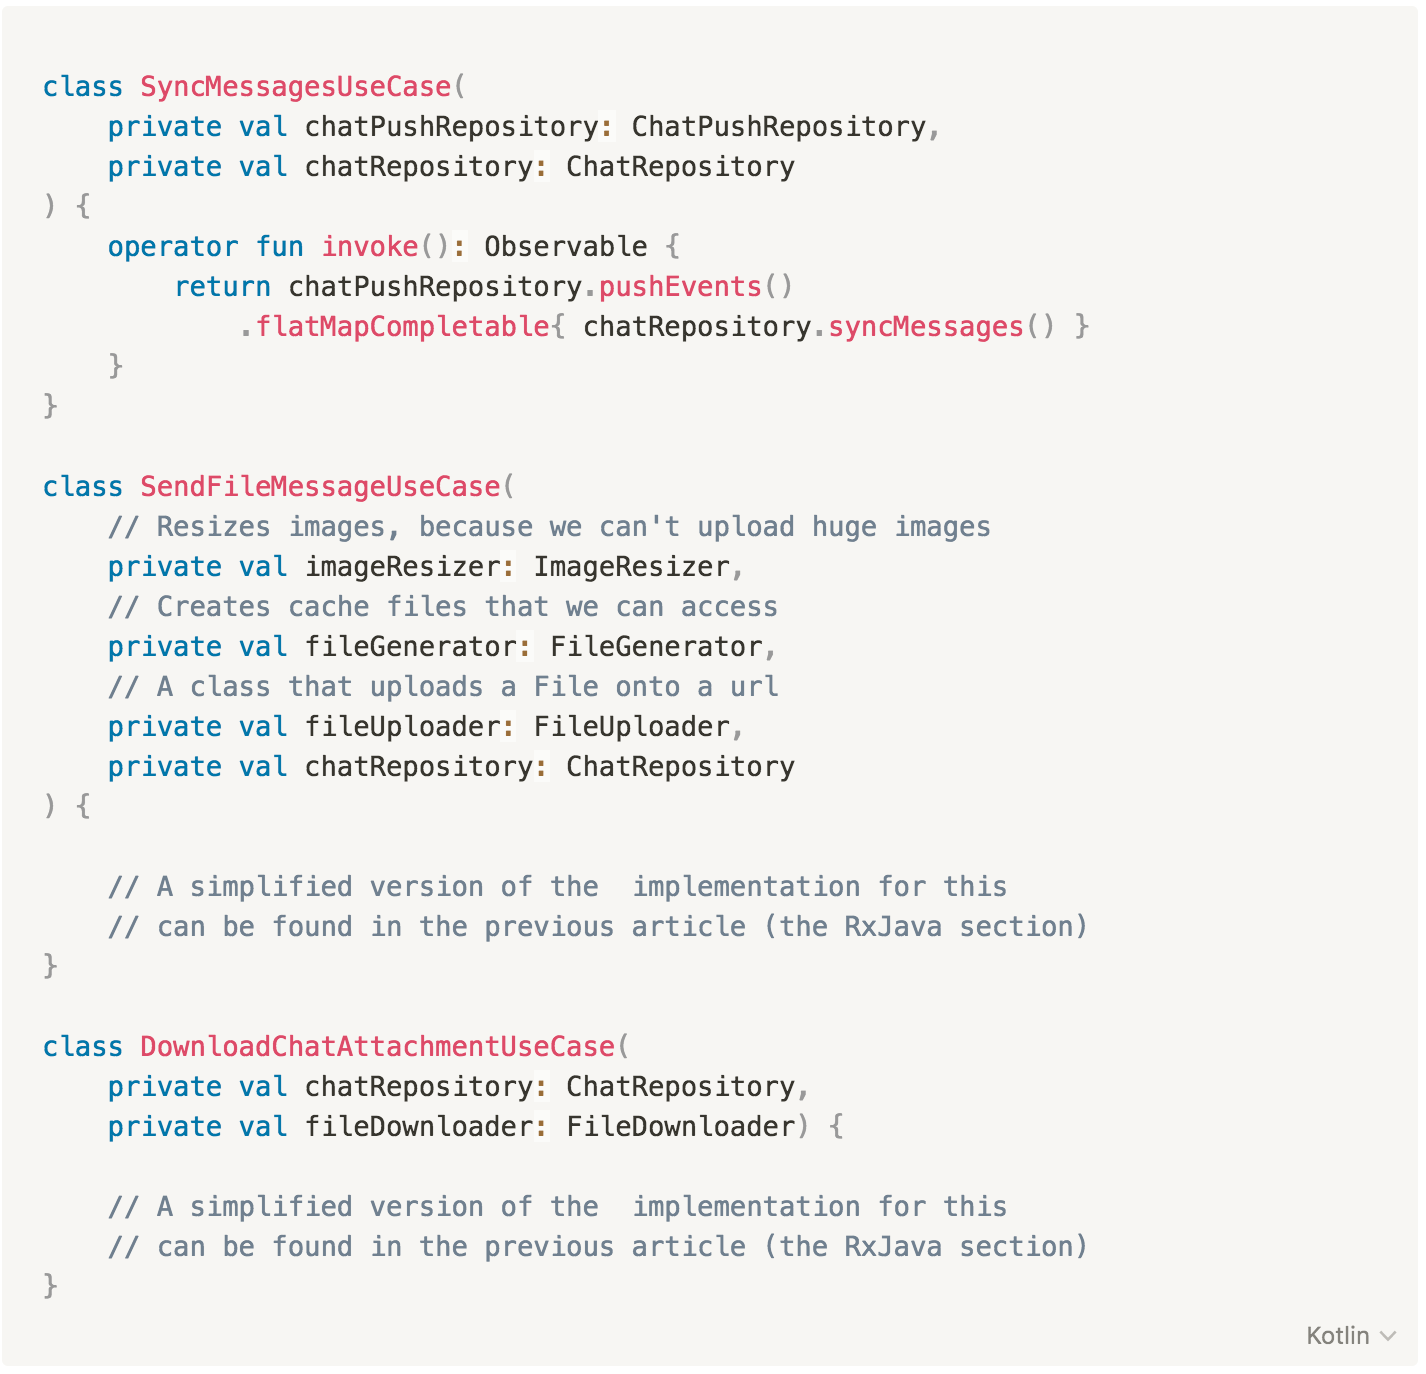
Chat UseCases
To combine information (and events) from multiple repositories (and other classes), we have one more layer in our architecture. We call these ‘UseCases’ ( these are also referred to as 'Interactors' in other ‘clean’ implementations). The purpose of a UseCase is to represent something that the user would actually do.
Here's a handful of our UseCases:
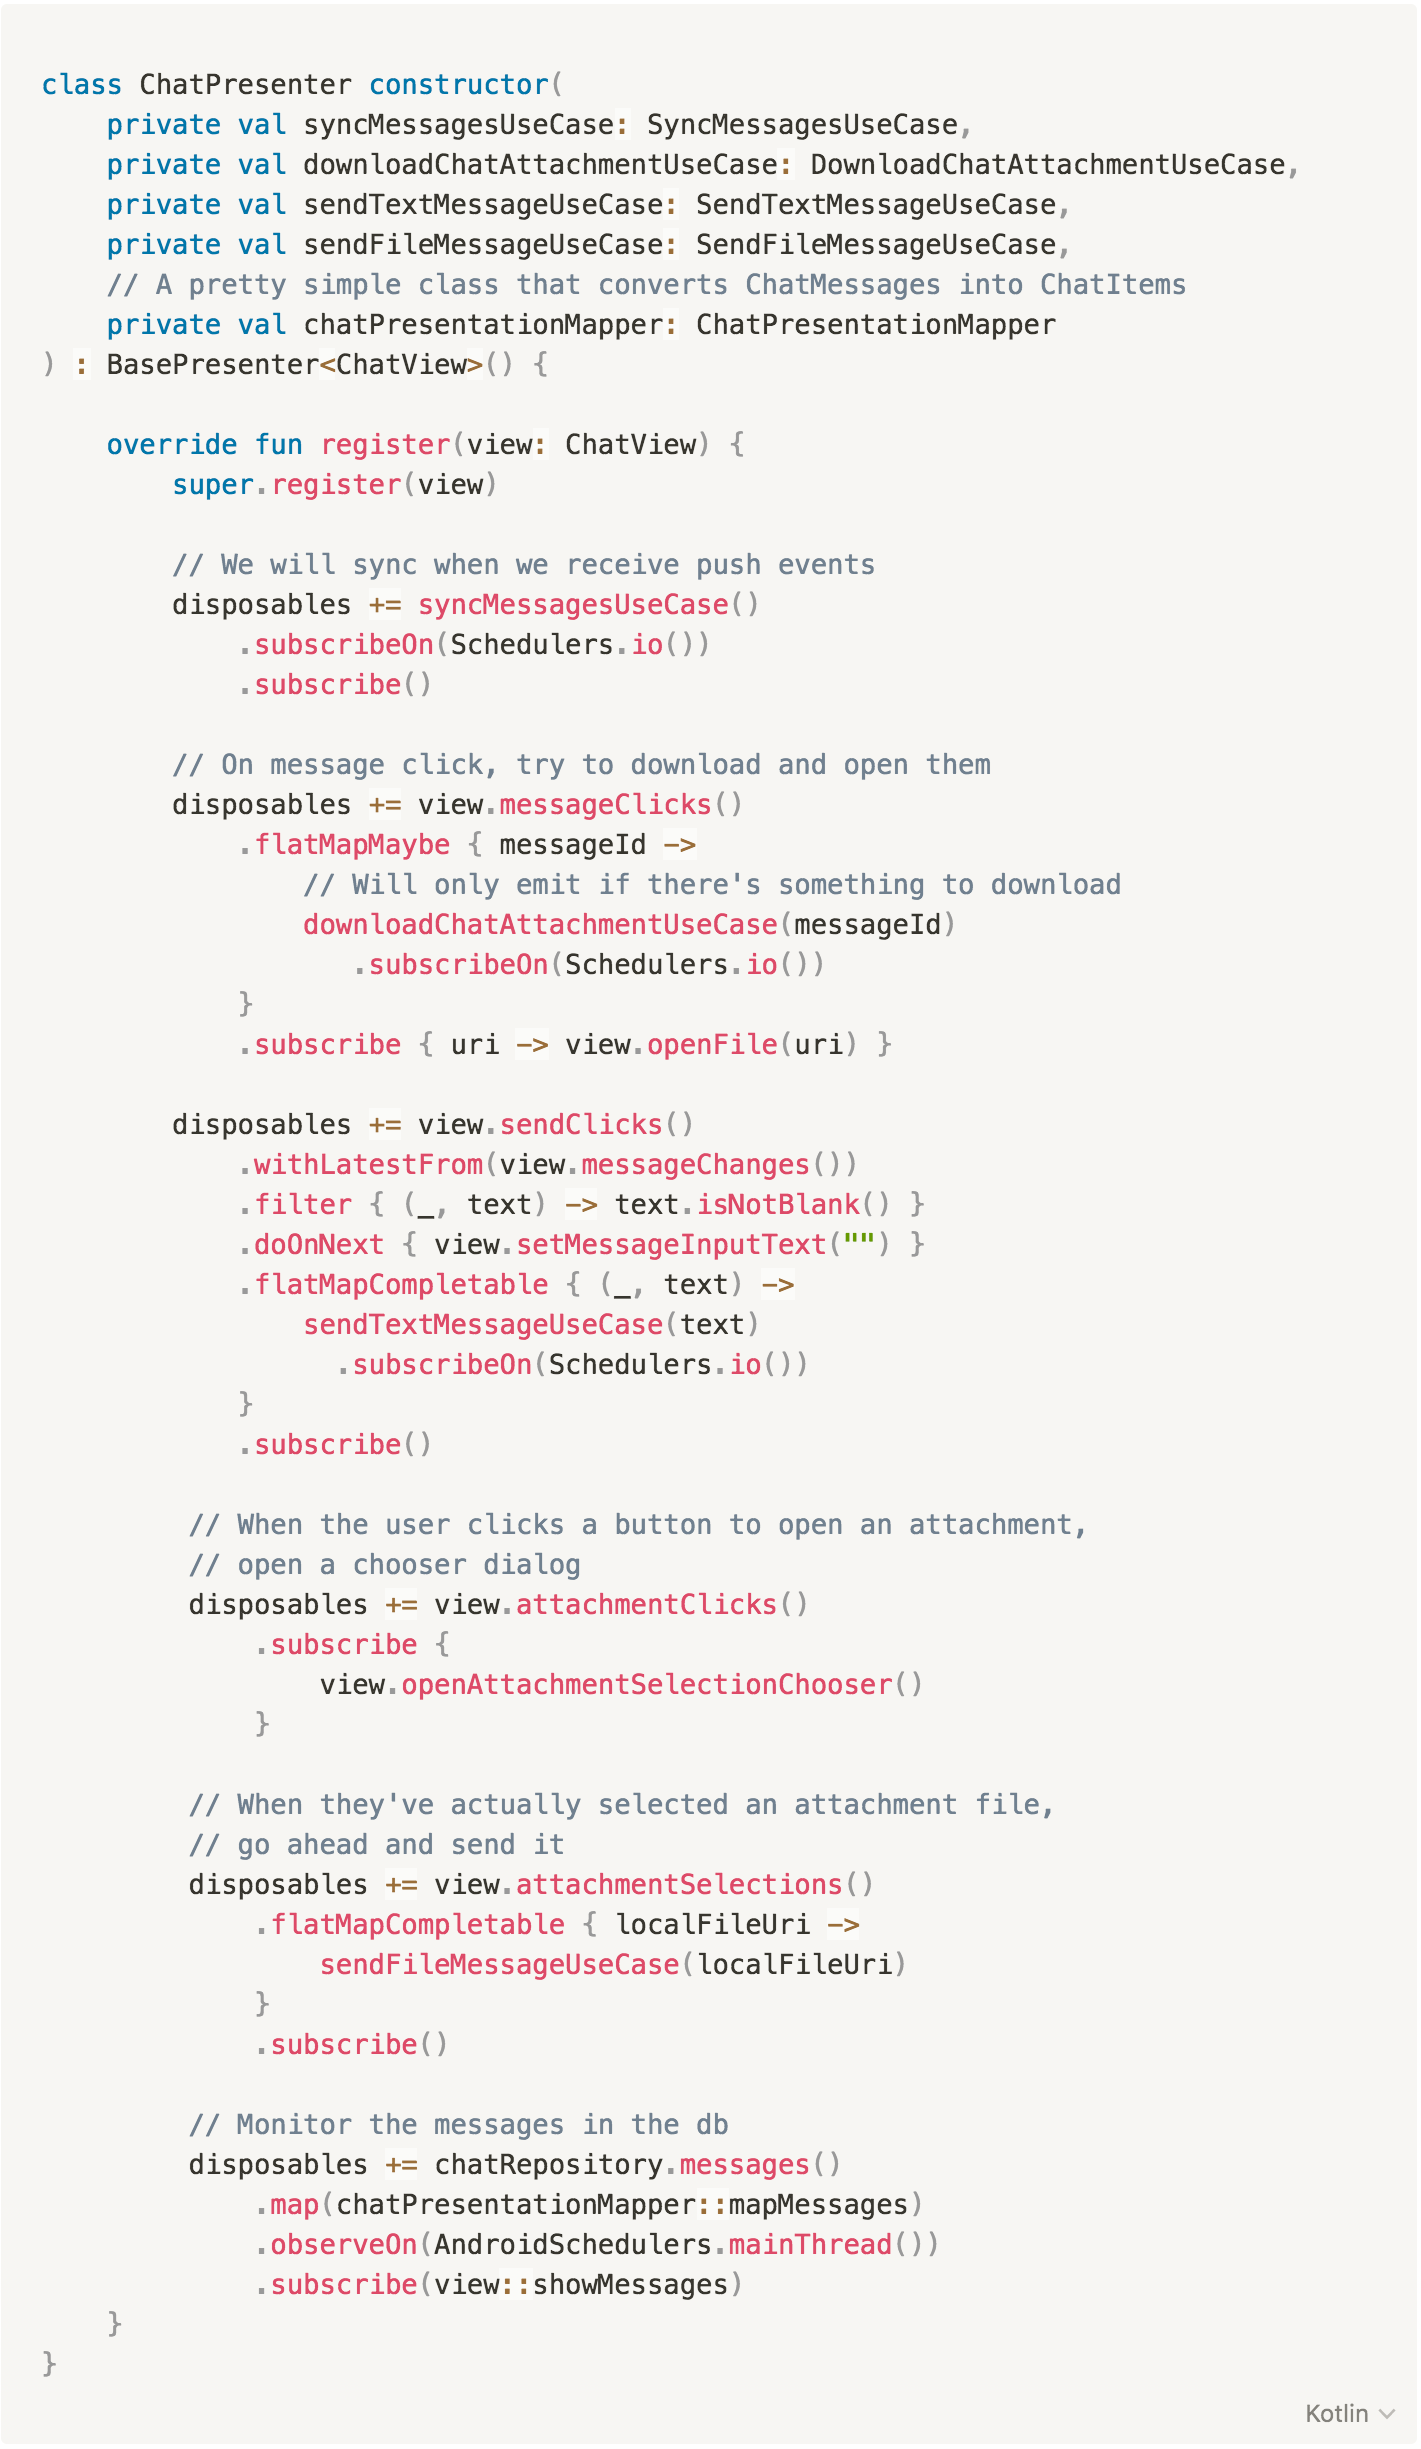
ChatPresenter
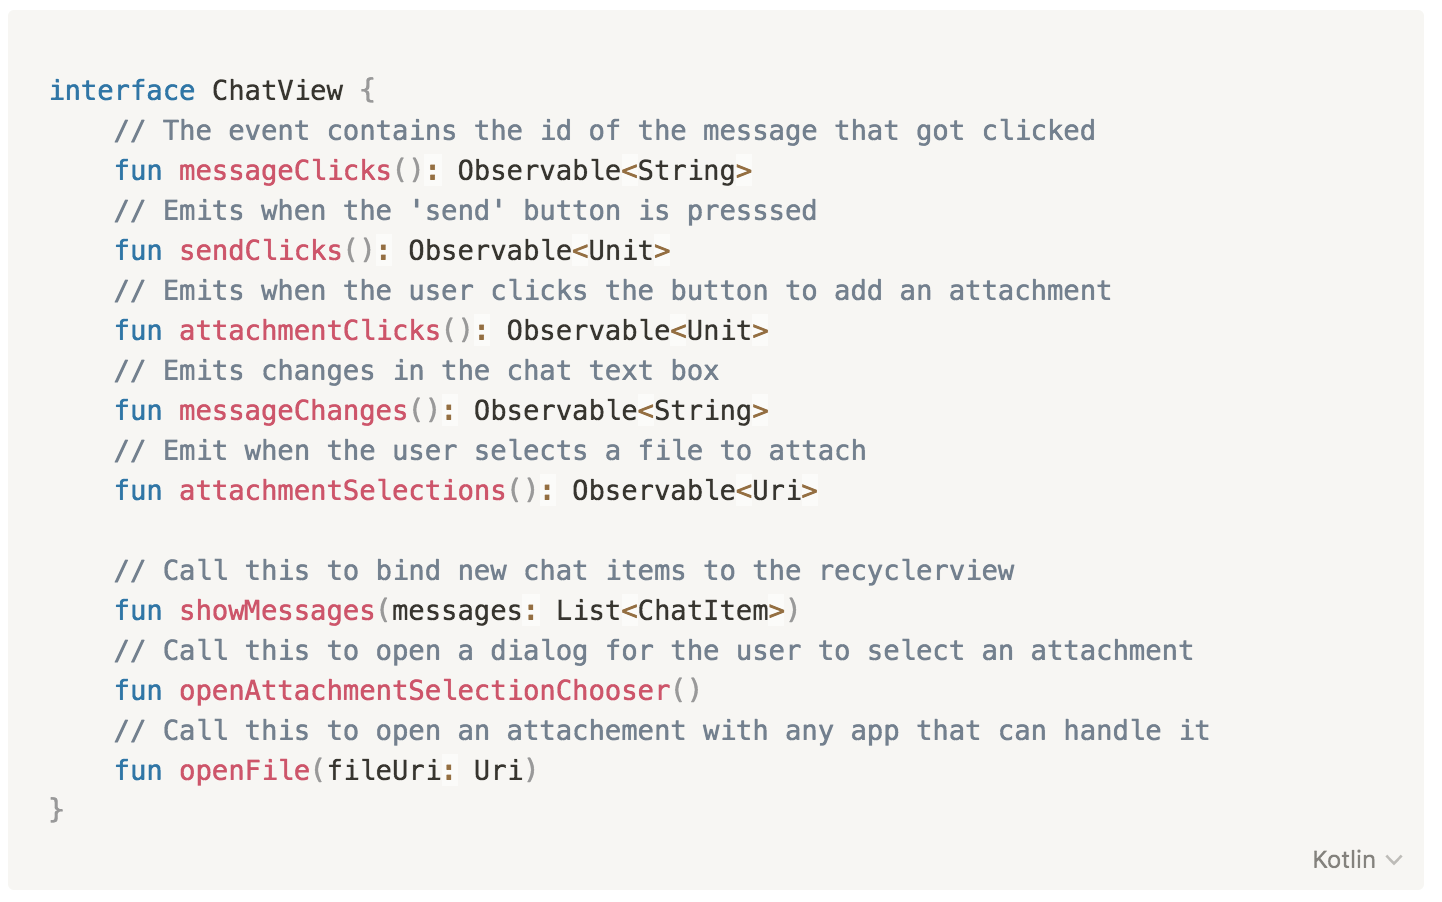
In Monzo we still use a (pretty simple) implementation of MVP. We leverage RxBinding to expose user event streams to the Presenter via the View interface. The presenter will also 'tell' the view when to do something (by calling methods on the View interface).
This is what the View interface looks like for Chat:
Finally, given the above UseCases, the actual implementation of the Presenter is pretty trivial (I’ve omitted a few things to keep the example simple):
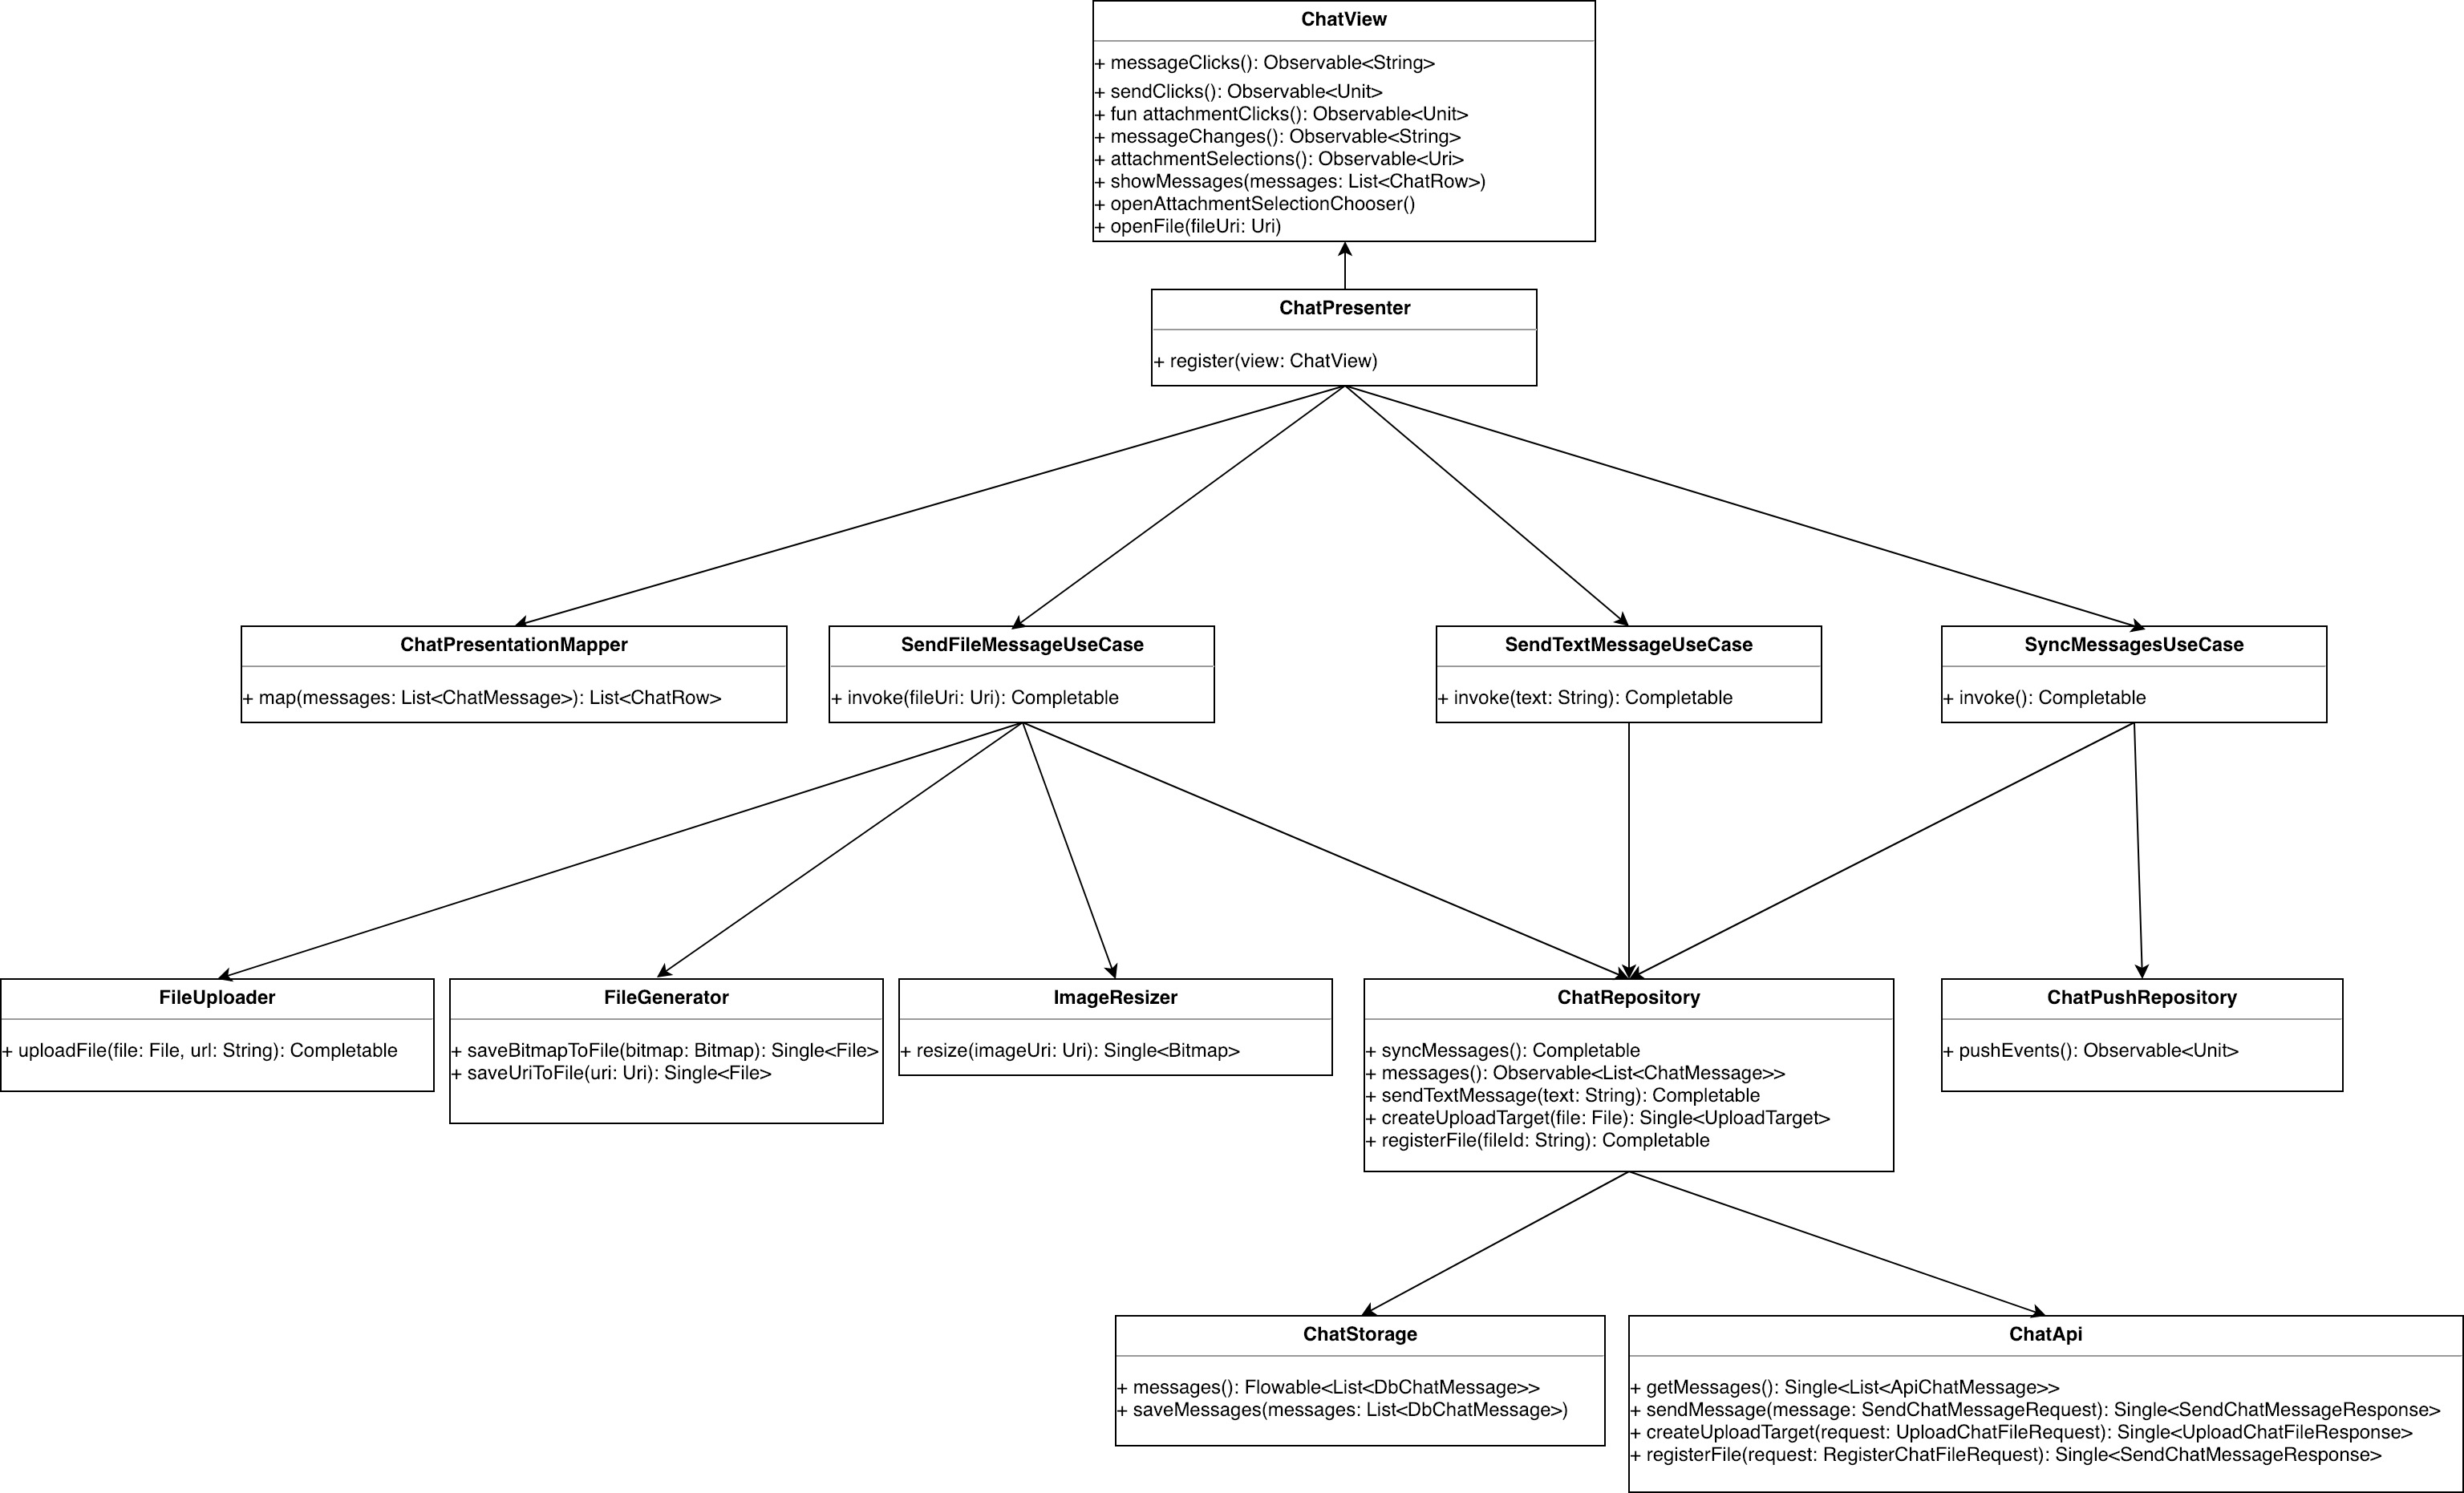
How the classes fit together
Here’s a diagram of how all the classes we’ve mentioned fit together:
Decisions, decisions, decisions
As is always the case with any implementation, we've made a few decisions based on certain assumptions. If the assumptions change, we'd have to adjust our implementation accordingly.
MVP vs MVVM
Although in this example we use a Presenter, as a team we've recently decided to gradually move away from MVP, and towards MVVM. We’re switching firstly to simplify writing unit tests (as we currently have to mock up all the reactive methods in the view interface), and secondly to move towards an architecture that’s similar to the one our iOS colleagues use.
Having said that, our goal is to minimise the amount of code in the Presenter/ViewModel, and try to have most of the logic inside UseCases. If we achieve that, it won’t matter whether we use MVP or MVVM. The bulk of the logic will exist on a lower level. In the Chat implementation we used a Presenter, but it's actually not that big. Converting it into a ViewModel would be pretty straightforward.
How many layers of abstraction do we need?
When looking at the amount of abstraction layers we have (Api + Db -> Repository -> UseCase -> Presenter -> View), you might think we needed either more or less. In our case, we think very carefully before adding another layer in our code.
We decide that having another layer is worth it if all of the following are true:
The new abstraction layer serves a real need. We’re not doing it just because someone else does. For example, although we draw inspiration from 'Clean Architecture’ when it comes to naming things, we don't believe we need to introduce all of its layers in our codebase.
The whole team is clear about what level of the architecture the new abstraction layer would sit on. For example, UseCases are obviously above Repositories classes, and Repositories are obviously above Storage classes.
The whole team is clear about the type of functionality the new abstraction layer would contain. For example, Repositories are there to send and retrieve data, whereas Presenters are there just to hook-up user events to UseCases, and UseCases to View methods.
We have a clear naming convention for the classes that appear on that layer. Not only all Api interfaces have the suffix
-Api(like ChatApi), but also, all the model classes that appear on that layer have theApi-prefix. Similarly, we haveChatStorageandDbChatMessageetc.
Otherwise, it's really easy to go overboard, and keep introducing more and more abstraction layers:
“All problems in computer science can be solved by another level of indirection...except for the problem of too many layers of indirection.”
We need to keep in mind that there's a big cost to having more levels of abstraction:
There’s significantly more code to maintain. Take into account not only the actual implementations of classes on each layer, but also the different model classes that you would need at each layer, plus all the mapping code.
It's much harder to keep writing code that adheres to the architecture. The more optional/irrelevant layers you have, the more reason each developer has to 'bypass' a few layers, which can easily end up in code that's not only inconsistent, but also more difficult to modularise (the dependency structure becomes more complicated).
It's harder for people unfamiliar with the architecture to understand it. Especially when we have a different amount of abstraction layers in different places.
Why is the ChatItem split like that?
There are lots of ways to go about splitting up the information contained in a ChatItem. We could use a single class with enums, have a boolean for whether a message is sent or received etc.
The reason we chose this hierarchy of sealed classes, is because we wanted it to resemble what the user sees. Each class in the hierarchy is actually displayed differently (i.e. uses a different layout file when the time comes to render it). The fact that they are displayed differently gives us a hint that the rest of the company (i.e. the designers/product managers etc) view these as separate entities.
As time goes by, we might want to add different functionality to each type of message. Having different classes to work with makes accommodating this a lot easier.